TUTORIALS
Welcome to the FestivalPro 1.0.0 Documentation.
Here you’ll find details on all updates and improvements to the platform.
We also provide help guides and tutorial videos, which are regularly updated and expanded.
To schedule a tutorial session, simply book a call back.
How-to guides
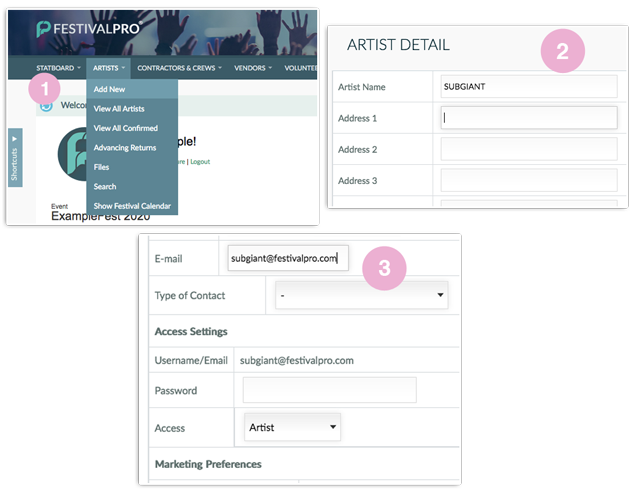
How to Add an Artist
- 1. Mouseover 'Artist' from the top menu and select 'Add New'.
- 2. On the page which appears, full in the information you have (more can be added as and when you would like).
- 3. On the right you will find the first contact information. If you enter an email address - this will create a user. This will enable the artist or a representative to log in and fill out the advance, contract, see their itinerary or see any other form your have created for the artist user.
- 4. When you have finished click 'Add'.
- 5. Once the artist is added you can add more contacts. On the left of the Artist Detail screen there are a list of actions - select 'Add Contact'.
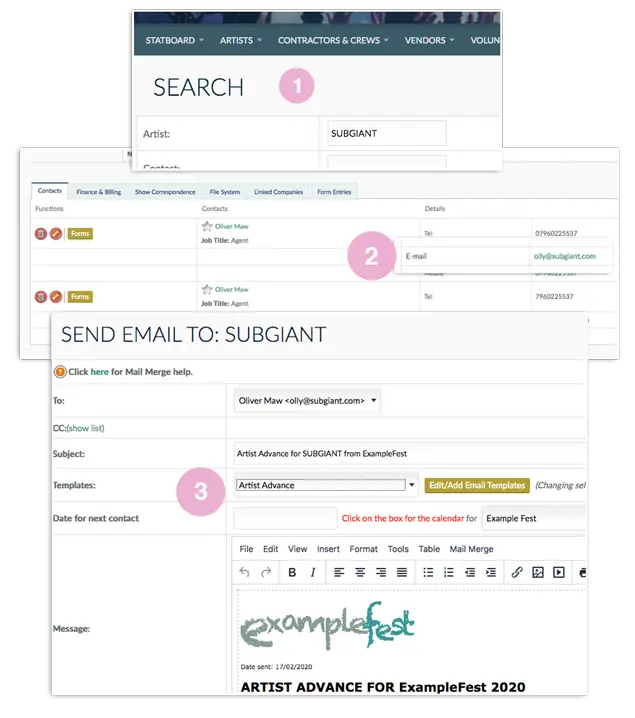
How to send an Artist Advance
NB. Make sure the artist has access to the system. See how to add an artist points 3,4,5.
- 1. Find the artist via Artist > Search. Use the options on the search screen to find the artist the you wish to send an advance to. If a list of artists appears click on the artist name to bring up their details. Scroll to the bottom of this page and you'll find the contacts for this artist.
- 2. Click on the email address and this will take you to the send email screen. Choose 'Artist Advance' from the email template list. The email will automatically full with all the information from the artists details page. If you want to change these templates - there is a button to the right where you can edit or add templates.
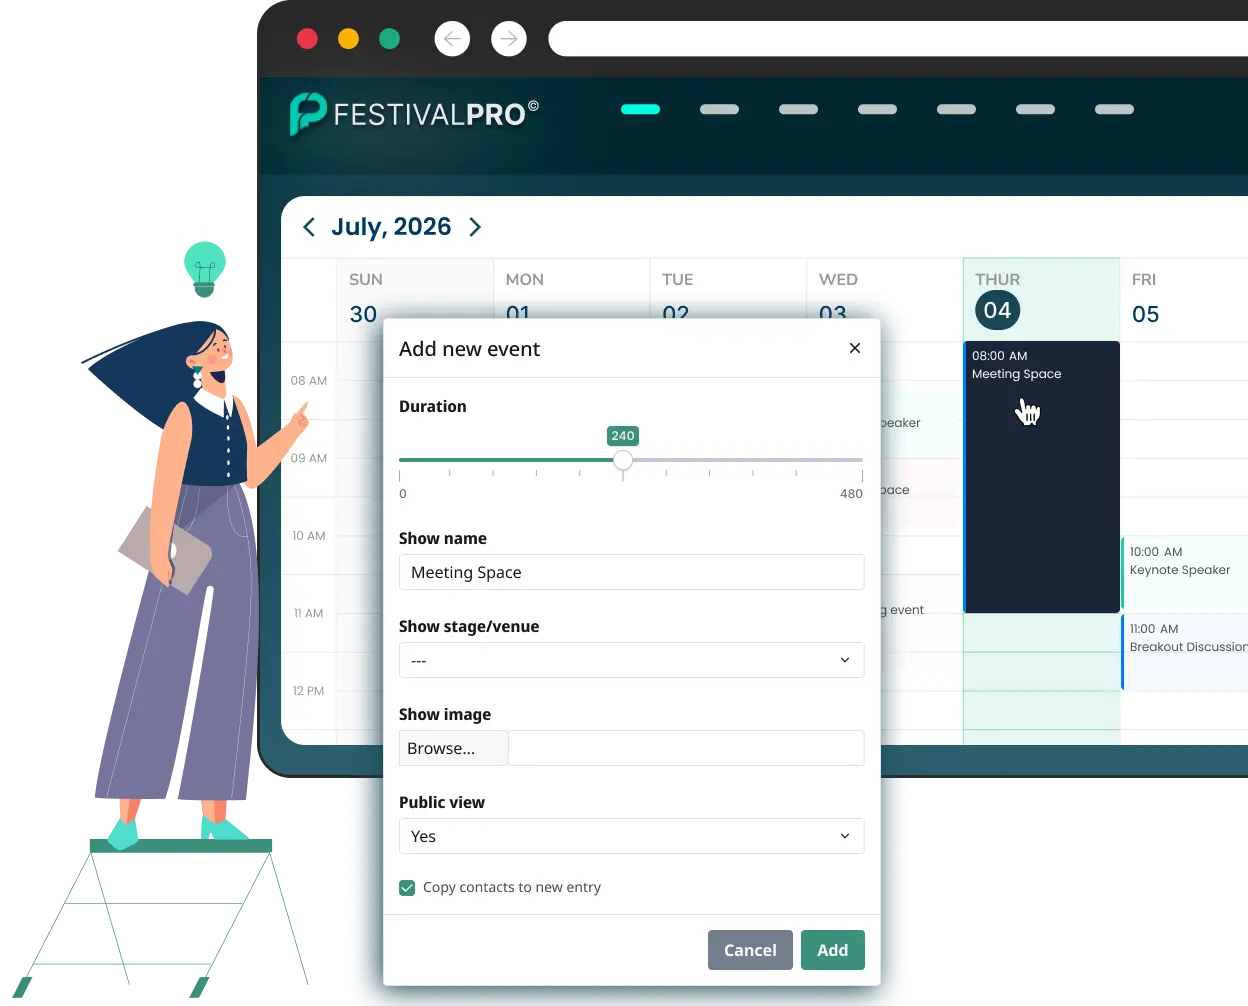
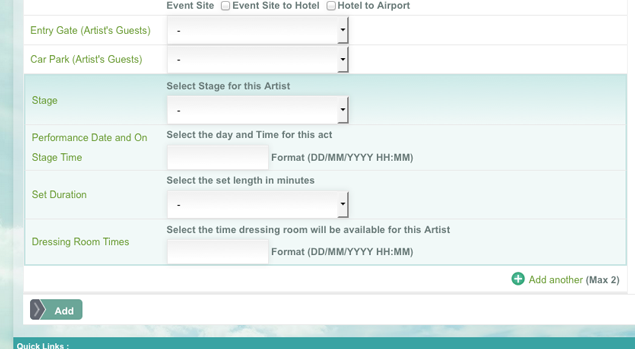
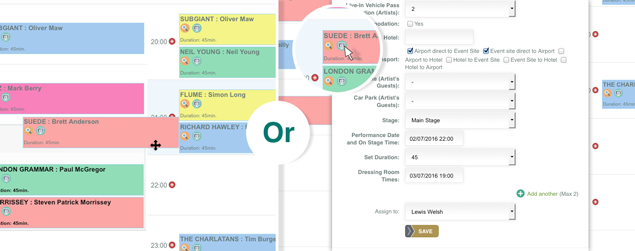
How to set stage times
When either adding an artist or editing the artist you can set the stage, date, time and set duration. This will automatically add the performance to the calendar.
View the festival calendar
Mouseover the 'Artist' option on the green menu and click on 'Show Festival Calendar'.
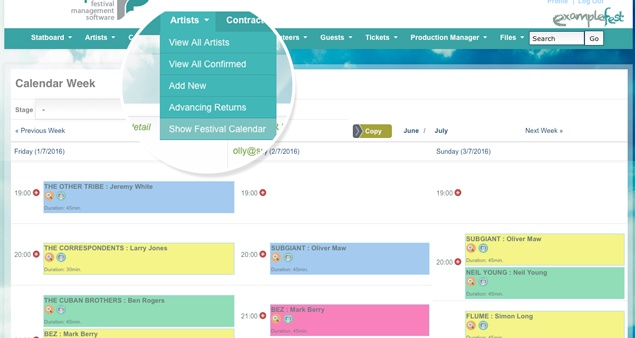
Change the stage times
You can move the performance by dragging it to the desired time. Or click on the edit button (shown below) and changing the times in the input boxes.
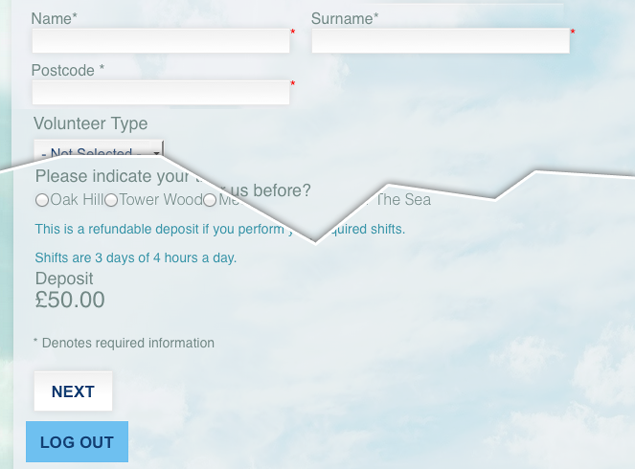
How to set a form
The present volunteer form can be sent to anyone to fill out. Once they have, you can be sent an email notification and you can choose whether to accept or decline the offer.
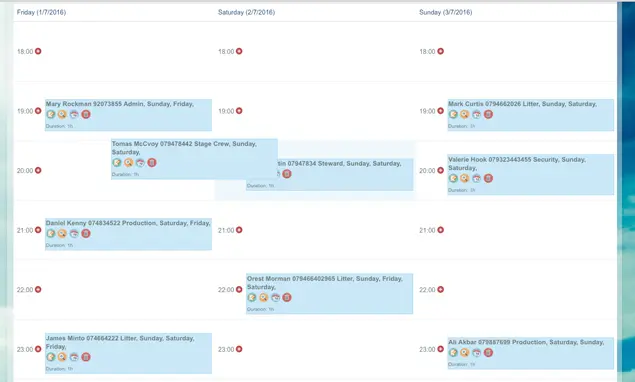
Arrange the volunteers timetables
Once accepted you can arrange when and where the volunteers work by using the click and drag on the calendar or change them via their main details screen.
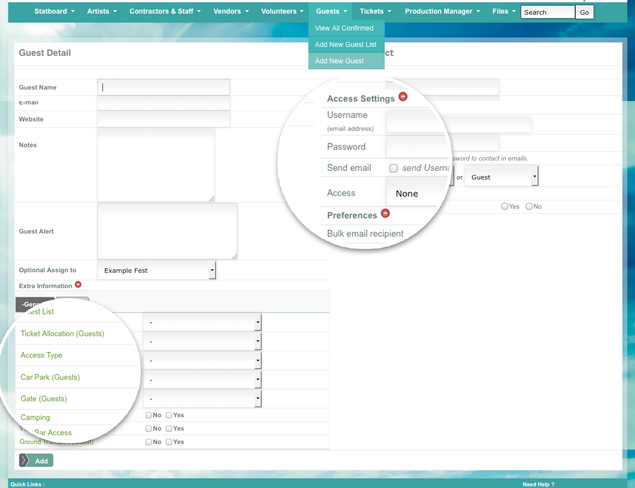
How to Add a Guest List
Hover over 'Guests' on the top green menu and click on 'Add New Guest'. On the screen which appears fill in the details like name, email and the amount of guests allowed.
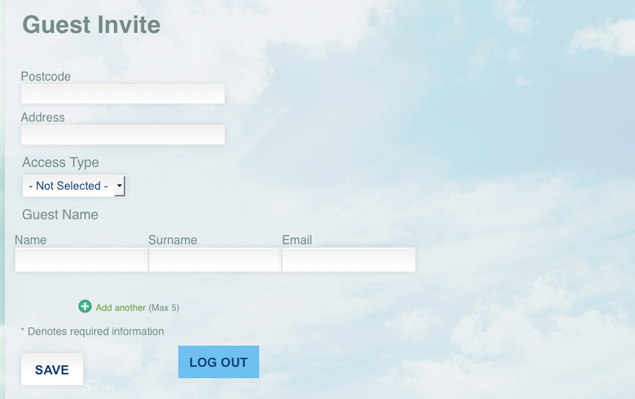
A guest can log in and fill in the form:
After the guest is added you can send them an email (select the email template from the drop down). The email will use mail merge to autofill and contain their login details. They can fill in details like names, car registration and anything else you wish to gather from them.
How to manage a project
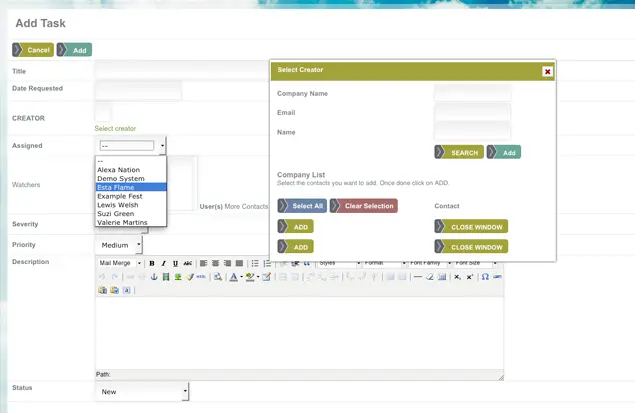
Adding a task
Under 'Production Manager' move the mouse over and click on 'Add'. This simple layout will appear where you can easily add a task with a much details as you like.
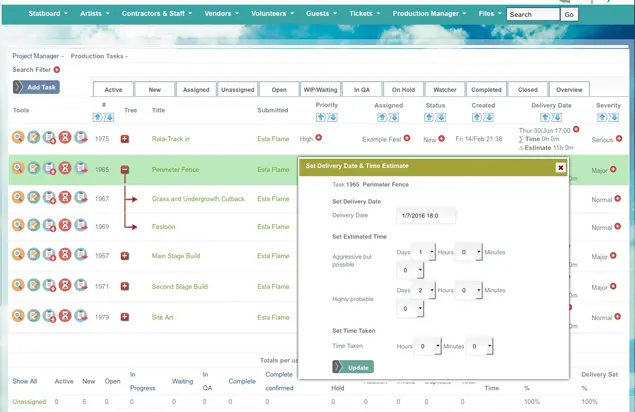
Viewing the tasks
Click on 'Show' and then the project you would like to view. The tasks in this project will appear, where you can edit the delivery date, status and assigned to.
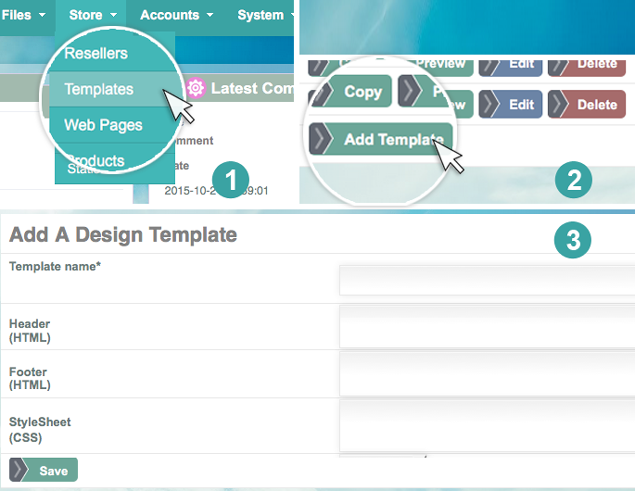
How to Add a page template
Set up an event template
Sign in as a Config user to change the page template.
- 1. Go to Files > Web Templates.
- 2. Then click 'Add Template'.
- 3. On this page insert a template name and the header and footer (in HTML) and the styling (CSS), then click 'Save'. If you need any help with this, please get in touch.
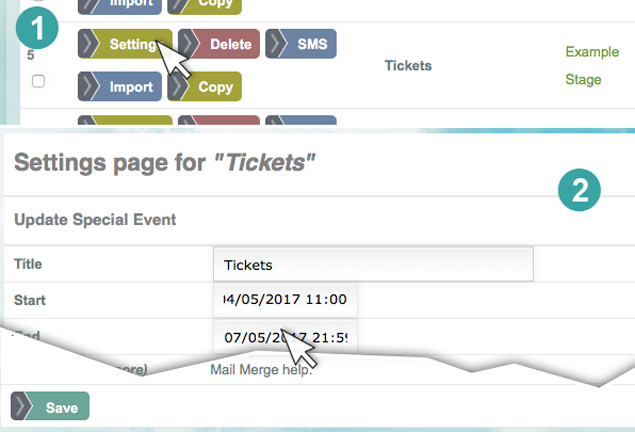
Set up an event
- 1. Go to 'Organiser' > 'Events' and scroll to the event entitled 'Tickets'. Click on the yellow 'Settings' button.
- 2. On this page set the date, template and any other settings you'd like to alter and click save. (These can be changed at any time).
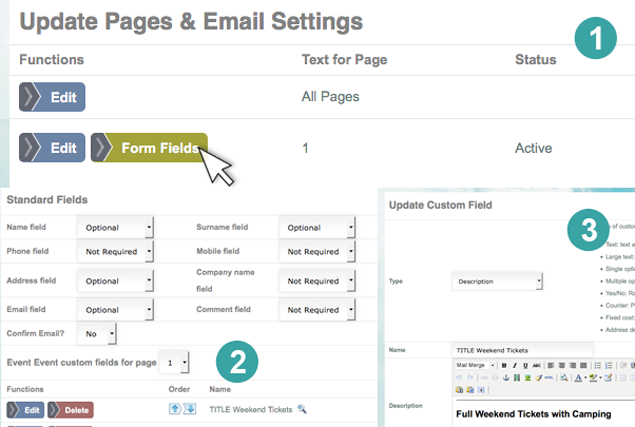
Edit Ticket types and options
Scroll down the above page to the yellow button 'Form Fields'
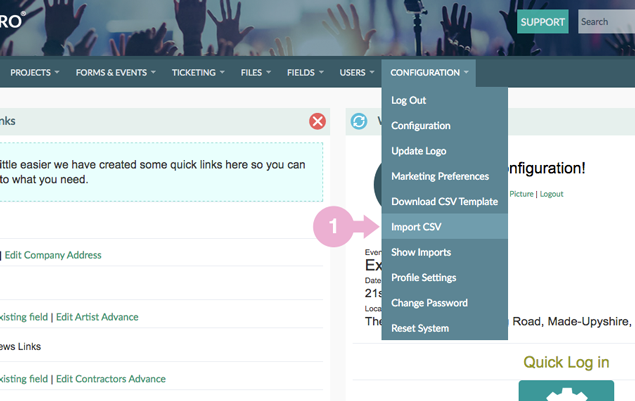
How to import a CSV spreadsheet
Make sure your CSV spreadsheet is ready to import. (If you go to 'System' > 'Configuration' > 'Download Template' there is a CSV for you to download and input your information or get an idea of the layout).
Sign in as a Config and go to 'System' on the top green menu > 'Configuration' > 'Import CSV'.
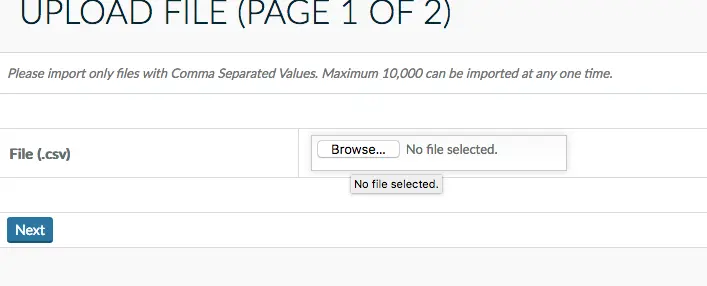
Choosing your file
You'll land on this screen where you click on browse to find the file on your computer, then press 'Next'.
Matching columns to fields
Upon landing on this screen you will see,to the left, two columns. The first one is a list of each column title you have in your CSV. The second column (containing drop-downs) are the fields in FestivalPro.
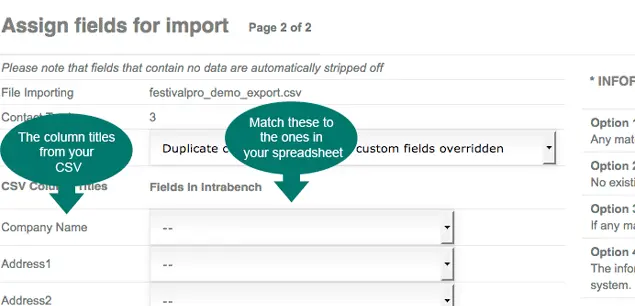
If you click on a drop down, you can match what is there to your CSV - so 'Company Name' will match 'Company Name'. This is where you put the artist/band name, as well as the vendor names, contractors, etc.
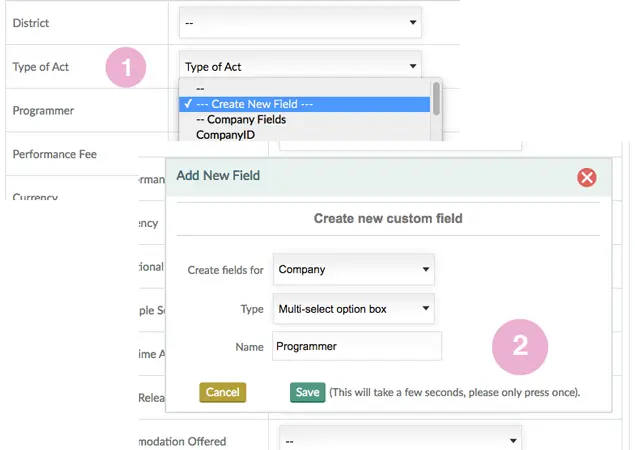
Creating a new field
If one of your fields doesn't match what is already in FestivalPro -the top selection is '--- Create New Field ---', click on this option. A popup will appear for you to select the type of field and choose the name. When you have clicked on save, the field will be added.
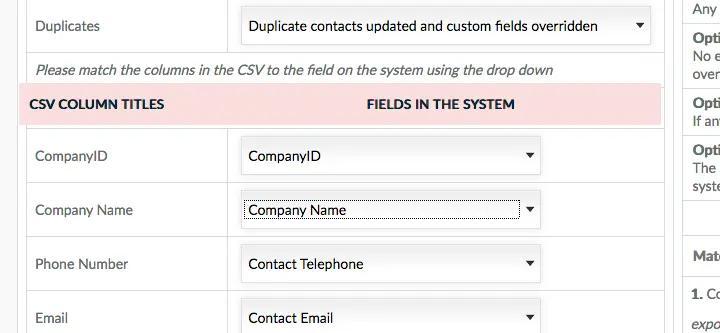
Importing if there are already details in the system:
If you already have entries in the system and you are importing a CSV which may contain the same information, there is a drop down to choose what to do with duplicates.
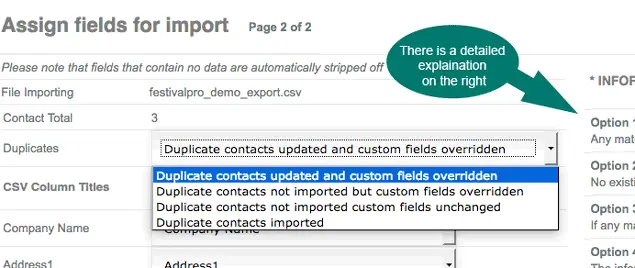
When this is done click 'NEXT'. </br> You will be directed to a page with the list of previous imports.
How to create or modify an SPF record
Setting up Sender Policy Framework (SPF) for your domain lets others know that email they are receiving is actually from you. Telling people where email is coming from.
An SPF record can be added to reflect any IP addresses that will be sending email on your domain’s behalf. When an email is sent claiming to be from your domain, the recipient server checks your SPF record to see if the sender is authorised to send on your behalf. If yes, the email receiver recognises the message is from you or a trusted third party and will choose to accept it based on your email reputation. If no, the email recipient can choose to examine the message more, put it into their spam folder or outright reject it.
To initiate SPF for your domain via your DNS hosting provider, follow these general guidelines:
- 1. Access your account
- 2. At Domains drop-down menu, select your domain name (click “Show All” if your domain is not displayed)
- 3. Under the DNS & Zone Files menu, click “Edit DNS Zone File”
- 4. Click “+ Add Row” to create a new record
- 5. Set the type to TXT and enter the SPF record below: v=spf1 a mx ip4:91.216.18.0/24 ~all
- 6. Click “Save”.
Video tutorials
Adding an artist
This tutorial takes you through adding an artist to the system and the application process.
Festival & Show Calendar
A brief overview of the festival and show calendar.
Basic form options
How to edit the fields on a form.
Exporting data & custom reports
A tutorial video on how to export data as an XML, CSV, PDF or custom report.
User Access
This tutorial covers the different user access levels within the system.
Setting up a system
How to set up a system using the BUY NOW link at the top of the page.
STRIPE account
Link your STRIPE account
Login as your 'config' user. Go to 'Configuration' on the top menu and then click 'Connect Stripe'.
Identity and Access Management
This page describes how Identity and Access Management (IAM) system works and how you can use it to manage access in FestivalPro.
Internal User (IN)
These would be members of your team who are helping organise the festival. They can edit different parts of the system, the contacts and companies.
External User (EX)
They are given a username and password but can only see the forms which are linked to them. EG an artist when they log in a can only complete their advance and agreement.
None (EX)
They can see only public forms. If they have bought tickets for an event they could have ambassador or reseller access where they can view and download the tickets they have bought.
Accounts (IN)
They can view the accounting information in the system - all invoices both created through the forms and through a company.
Artist (EX)
By default they can log in and view the forms: Artists Advance Artists Agreement. They reach a landing page which has links to both. They can only see the information you have mail merged into the forms. It's best to add a contractor through Artist > Add Artist.
Artist Liaison (IN)
They can see the Statboard, Search, view, edit, contact, export all Artists. They can view and edit the forms: Artist Application, Artists Advance, Artists Agreement.
Artist Liaison - Limit Assigned (IN)
They can see the Statboard, Search, view, edit, contact, export all Artists who are assigned to them. They can view the forms: Artist Application, Artists Advance, Artists Agreement.
Artist Liaison - View Only (IN)
They can see the Statboard, Search, view, contact, all Artists but not edit any of the information. They can view the forms: Artist Application, Artists Advance, Artists Agreement.
Config (IN)
This user has the greatest privileges within the system. They can add/edit users, forms, ticketing general configuration and edit fields.
Contractor (EX)
When this user logs in they are directed straight to the Contractor Contract. They can only see the information you have mail merged into the forms. It's best to add a contractor through Contractor & Crews > Add Contractor.
Crew (EX)
They reach a landing page which has a link to the Staff/Crew Tickets page. They can only see the information you have mail merged into the form. It's best to add a contractor through Contractor & Crews > Add Crew.
Guest (EX)
When this user logs in they are directed straight to the Guest Invite form. They can only see the information you have mail merged into the forms.
Limit Assigned (IN)
This user can only edit or view the artists, vendors, contractors, etc which are assigned to them.
Organiser (IN)
This user has the second most privileges. They can see all parts of the system from Artists to Volunteers. The Organiser can edit, add, export and delete anything from these categories. They can edit the forms and see the registrations for each form and events. They can't see the Box Office side of the festival or create or delete fields.
Scanner (IN)
The Scanner user is to log in to the system to scan the tickets via the Festival Pro App.
Sponsor (EX)
When this user logs in they are directed straight to the Sponsor Payment form. They can only see the information you have mail merged into the forms.
Staff (EX)
When this user logs in they are directed straight to the Staff Contract form. They can only see the information you have mail merged into the forms.
Staff Manager (IN)
This user can see the Contractors & Crews, Volunteers, Production Manager areas of the system. They can edit, add and export the contractors, crew and volunteers.
Staff Manager - Limit Assigned (IN)
This user can see the Contractors & Crews, Volunteers, Production Manager areas of the system. They can edit, add and export the contractors, crew and volunteers who are assigned to them.
Staff Manager - View Only (IN)
This user can see the Contractors & Crews, Volunteers, Production Manager areas of the system. They can only view the contractors, crew and volunteers.
Stage Manager (IN)
This user can see the Artist, Contractors & Crews, Volunteers, Production Manager areas of the system. They can edit, add and export the artists and venues.
Super Admin (IN)
Festival Pro staff user. This is for use to make any changes to your system setup.
Ticketing (IN)
This is a user for the Box Office. They can view the ticket bookings, contact customers, view the payments made, create discount codes and issue refunds. The ticketing login can also view the contact us and mailing list forms.
Vendor (EX)
By default they can log in and view the form: Vendor Contract. They reach a landing page which has a link to that form. They can only see the information you have mail merged into the forms. It's best to add a contractor through Vendors > Add Vendor.
Vendor Manager (IN)
They can see the Statboard, Search, view, edit, contact all Vendors. They can view the forms: Vendor Application Form, Vendor Contract. View, issue and search invoices and products.
Vendor Manager - Limit Assigned (IN)
They can see the Statboard, Search, view, edit, contact Vendors who are assigned to them. They can view the forms: Vendor Application Form, Vendor Contract. View, issue and search invoices and products.
Vendor Manager - View Only (IN)
They can see the Statboard, Search, view and contact Vendors. They can view the forms: Vendor Application Form, Vendor Contract. View, issue and search invoices and products.
View Only (IN)
This user can log in and search the system, but they can can view the details, not edit the information.
Volunteer (EX)
By default they can log in and view the form: Volunteer Payment Form. They can only see the information you have mail merged into the forms. It's best to add a volunteer through Volunteer > Add New Application or Add New. or they apply through the public form.
Volunteer Coordinator (IN)
This user can see the Volunteers, Production Manager, File areas of the system. They can edit, add, contact, organise and export the volunteers.
Volunteer Coordinator - Limit Assigned (IN)
This user can see the Volunteers, Production Manager, File areas of the system. They can edit, add, contact, organise and export the volunteers who are assigned to them.
Volunteer Coordinator - View Only (IN) -
This user can see the Volunteers, Production Manager, File areas of the system. They can contact, organise and export the volunteers.
Web Design (IN)
Web Design (IN)
User Flows
Here is a list of user flows. We have put them together to show you the various ways the artists, vendors or volunteers can be go through the system. From entering their details to sending them advances and receiving deposits.
Artist Management
This shows the basic process from adding the artists details to show order
Artist Management
Add new
Add the artist details manually.
or
Artist application
Submit artist details via an online form.
or
Import details
Import artist details from a spreadsheet.
Organiser:
Review application (approved/declined)
If approved
Confirm acceptance of terms & conditions.
Confirm ticket and performance details, including allocation, duration, fees, hotel, travel, and rider requirements. Stage and performance times can be amended at any time.
or
If declined
Send an email to inform of the outcome.
Validate:
Are you a new or existing user?
If New User
Set login details and log in to the account.
or
If Existing User
Login to account
Artist or representative logs in
reviews, agrees, and submits the contract/advance form.
Event organiser reviews the submitted form.
1. Download the images for the website/program, tech specs, audio, and lighting, etc.
2. Compile guest list
Vendor Management
This shows the basic process from adding the vendor details to advancing.
Vendor / Trader Management
Add new
Add the vendor details manually.
or
Vendor application
Submit vendor details via an online form.
or
Import details
Import vendor details from a spreadsheet.
Organiser:
Review application (approved/declined)
If approved
Confirm acceptance of terms & conditions.
Confirm ticket allocation.
or
If declined
Send an email to inform of the outcome.
Validate:
Are you a new or existing user?
If New User
Set login details and log in to the account.
or
If Existing User
Login to account
The advance form
The vendor receives the link to the advance form with login details.
The vendor or their representative completes form
The vendor or their representative completes the advance form, which includes: pitch details(size), electrical hookups, onsite contracts, vehicle registration, insurance documents, and risk assessments.
Also allows vendors to request additional tickets, electrical hookups, or other requirements. Payments can be made via Stripe, PayPal, or invoice, and the vendor’s signature is recorded automatically.
Event organiser reviews the submitted form.
The organiser can review these forms, download images for the website or programme, and check any orders for extras.
Volunteer Management
This shows the basic process from adding the volunteer details to advancing.
Volunteer Management
Add new
Add the volunteer details manually.
or
Volunteer application
Submit volunteer details via an online form.
or
Import details
Import volunteer details from a spreadsheet.
Pay deposit
Take a deposit through Stripe / PayPal.
Organiser:
Review application (approved/declined)
If approved
Confirm acceptance of terms & conditions.
View or download the list of confirmed volunteers.
Schedule volunteer shifts.
or
If declined
Send an email to inform of the outcome and return deposit.
Volunteer shifts
Preview volunteer shifts in an event calendar.
Volunteer communication
An email is sent to the volunteer(s) to inform them of their schedule.
Contractor Management
This shows the basic process from adding the contractor details to their contract.
Contractor Management
Add new
Add the contractor details manually.
or
Contractor application
Submit contractor details via an online form.
or
Import details
Import contractor details from a spreadsheet.
Organiser:
Review application (approved/declined)
If approved
Confirm acceptance of terms & conditions.
Confirm ticket allocation.
or
If declined
Send an email to inform of the outcome.
Validate:
Are you a new or existing user?
If New User
Set login details and log in to the account.
or
If Existing User
Login to account
The advance form
The contractor receives the link to the advance form with login details.
The contractor or their representative completes form
The contractor or their representative completes the advance form, which includes staff details (arrival and departure times), vehicle registrations, insurance documents, risk assessments, and other required documents.
Event organiser reviews the submitted form.
The organiser can review these forms and download the contract list for accreditations.
Sponsor Management
This shows the basic process from adding the sponsor details to advancing.
Sponsor Management
Add new
Add the sponsor details manually.
or
Sponsor application
Submit sponsor details via an online form.
or
Import details
Import sponsor details from a spreadsheet.
Organiser:
Review application (approved/declined)
If approved
Confirm acceptance of terms & conditions.
Confirm ticket allocation.
or
If declined
Send an email to inform of the outcome.
Validate:
Are you a new or existing user?
If New User
Set login details and log in to the account.
or
If Existing User
Login to account
Sponsorship package payment
The sponsor receives the link to the payment form with login details.
The sponsor or their representative completes form
The sponsor or their representative completes the advance form, which includes names for passes, details of the sponsor package to purchase, ticket information, and vehicle registration.
Event organiser reviews the submitted form.
The organiser can review these forms and download the contract list for accreditations.